
Refractory Dryout and Spalling in Fired Heaters
Fired heaters are the workhorses of many industrial processes, delivering the high temperatures needed to drive chemical reactions and heat transfer. A critical component of these heaters is the refractory lining, which insulates and protects the steel shell from extreme heat. But like any hero, refractory materials have their vulnerabilities—dryout and spalling being two of the most common and potentially damaging issues.
What is Refractory Dryout?
Refractory dryout is the controlled process of gradually heating the refractory lining to remove moisture absorbed during installation or repair. This step is crucial because rapid heating can cause steam to form inside the refractory, leading to cracking or even explosive damage.
The dryout procedure typically involves slowly ramping up the temperature in stages, holding at certain points (e.g., around 1200°F) to ensure thorough moisture removal. This methodical approach prevents thermal shock and allows trapped water vapor to escape safely through the refractory structure.
Proper dryout is not just a best practice—it's essential for the long-term integrity and performance of your fired heater's refractory system.
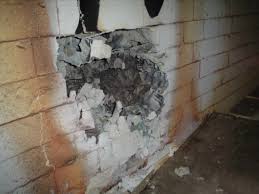
The Link Between Dryout and Spalling
Spalling, the flaking or breaking off of refractory material, often results from improper dryout. When moisture remains trapped inside the refractory, rapid temperature changes cause steam pressure buildup, leading to internal stresses that crack and dislodge the lining.
This not only compromises insulation but also exposes the heater's steel shell to damaging heat, increasing maintenance costs and downtime. The economic impact can be severe—emergency shutdowns, extensive repairs, and lost production time can cost hundreds of thousands of dollars.
Understanding this relationship is key to preventing costly failures and ensuring safe, efficient heater operation.
Preventing Spalling Through Proper Dryout
Adhering to meticulous dryout procedures is the best defense against spalling. By slowly increasing temperature and holding at critical points, trapped moisture is safely driven off, preserving the refractory's integrity.
Key prevention strategies include:
- Following manufacturer-specific dryout schedules
- Monitoring stack emissions for visible steam (indicating incomplete dryout)
- Avoiding flame impingement on refractory surfaces
- Performing regular visual inspections for cracks or loose material
- Maintaining proper heater draft to prevent overheating
Additionally, avoiding flame impingement and performing regular inspections further reduce the risk of spalling. These proactive measures can extend refractory life by years and prevent unexpected failures.
Typical Dryout Procedure
Startup and maintenance personnel should prioritize thorough refractory dryout and maintenance protocols to ensure the fired heaters operate safely, efficiently, and with minimal downtime.
For reference, here is a typical dryout procedure for a new heater. Consult with the manufacturer for a precise dryout procedure for your specific heater. Something to keep in mind is that if visible steam is exiting the stack, the dryout is not complete.
Critical Note: Always follow your heater manufacturer's specific dryout procedure, as refractory types and installation methods vary. The procedure below follows a leading manufacturer's procedure for castable refractory dryout.
Important: This procedure requires three cycles of at least 8 hours duration per cycle. Quicker procedures do not provide acceptable castable dryout/curing and greatly increase the chances of spalling damage during heater startup.
- Preparation: Confirm that the coil is totally empty
- Pilot Phase: Light pilots and allow them to fire for 24 hours
- Main Burner Start: Light main burners and fire at minimum fuel pressure
- First Ramp: Raise the flue gas bridgewall temperature to 300°F at 50°F/hr (shut off enough burners to maintain temperature at 300°F ± 10°F; rotate firing positions for even heat distribution)
- First Hold: Hold bridgewall temperature at 300°F for 8 hours
- Second Ramp: Raise the bridgewall temperature to 400°F at 50°F/hr
- Second Hold: Hold bridgewall temperature at 400°F for 8 hours
- Third Ramp: Raise flue gas temperature to 500°F at 50°F/hr
- Third Hold: Hold flue gas temperature at 500°F for 8 hours
- Final Phase: Gradually increase to normal operating temperature as needed
Monitor the stack continuously during this process—visible steam indicates the need to hold at the current temperature longer before proceeding.
Try it today and see how much time you can save!